.NSFile
Designing a Network Topology
Part of Emulab’s power lies in its ability to assume many different topologies; the description of a such a topology is a necessary part of an experiment. (Note: You may want to take a look at our Java GUI to build experiments without directly editing NS files.) Emulab uses the “NS” (“Network Simulator”) format to describe network topologies. This is substantially the same Tcl-based format used by ns-2. Since Emulab offers emulation, rather than simulation, these files are interpreted in a somewhat different manner than ns-2. Therefore, some ns-2 functionality may work differently than you expect, or may not be implemented at all. Please look for warnings of the form:
If you feel there is useful functionality missing, please let us know. Also, some testbed-specific syntax has been added, which with the inclusion of compatibility module (tb_compat.tcl), will be ignored by the NS simulator. This allows the same NS file to work on both Emulab and ns-2, most of the time.
For those unfamiliar with the NS format, here is a small example (We urge all new Emulab users to begin with a small 3-5 node experiment such as this, so that you will become familiar with NS syntax and the practical aspects of Emulab operation). Let’s say we are trying to create a test network which looks like the following:
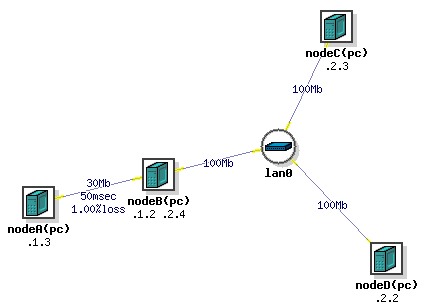
(A is connected to B, and B to C and D with a LAN.) An NS file which would describe such a topology is as follows. First off, all NS files start with a simple prologue, declaring a simulator and including a file that allow you to use the special tb-commands:
  	# This is a simple ns script. Comments start with #.
  	set ns [new Simulator]
        source tb_compat.tcl
Then define the 4 nodes in the topology.
  	set nodeA [$ns node]
  	set nodeB [$ns node]
  	set nodeC [$ns node]
  	set nodeD [$ns node]
nodeA and so on are the virtual names (vnames) of the nodes in your topology. When your experiment is swapped in, they will be assigned to physical node names like “pc45”, probably different ones each time. (NOTE: It’s a bad idea to pick vnames that clash with the physical node names in the testbed.)
Next define the link and the LAN that connect the nodes. NS syntax permits you to specify the bandwidth, latency, and queue type. Note that since NS can’t impose artificial losses like Emulab can, there is a separate command to add loss on a link. For our example, we will define a full speed LAN between B, C, and D, and a shaped link from node A to B.
  	set link0 [$ns duplex-link $nodeB $nodeA 30Mb 50ms DropTail]
  	tb-set-link-loss $link0 0.01
  	set lan0 [$ns make-lan "$nodeD $nodeC $nodeB " 100Mb 0ms]
In addition to the standard NS syntax above, a number of extensions have been added that allow you to better control your experiment.
For example, you may specify what Operating System is booted on your nodes. We currently support FreeBSD 4.10, FreeBSD 6.2, RedHat Linux 9.0, Fedora Core 4, Fedora Core 6, and Windows XP. Windows 2000 is not supported. Fedora Core 2 (Linux 2.6) is available but unsupported. We also support OSKit kernels on the Emulab PCs.
Click List ImageIDs and OSIDs in the Emulab web interface “Interaction” pane to see the current list of Emulab-supplied OS. By default, our most recent Linux image is selected.
  	tb-set-node-os $nodeA FBSD-STD
  	tb-set-node-os $nodeC RHL-STD
  	tb-set-node-os $nodeC WINXP-UPDATE
In a topology like this, you will likely want to communicate between all the nodes, including nodes that aren’t directly connected, like A and C. In order for that to happen, we must enable routing in our experiment, so B can route packets for the other nodes. The typical way to do this is with Static routing. (Other options are detailed below, in the Routing section below.
$ns rtproto Static
Lastly, all NS files end with an epilogue that instructs the simulator to start.
 	# Go!
  	$ns run
If you would like to try the above example, the completed NS file can be run as an experiment in your project. Because NS is based on TCL, the full power of the TCL language is available for you to use in your NS files, including loops, control structures, and even procedures/functions. Here’s an example of a simple loop: (Download this example: loop.ns)
  	# This is a simple ns script that demonstrates loops.
  	set ns [new Simulator]
  	source tb_compat.tcl
  	set maxnodes 3
  	set lanstr ""
  	for {set i 1} {$i <= $maxnodes} {incr i} {
  	    set node($i) [$ns node]
  	    append lanstr "$node($i) "
  	    tb-set-node-os $node($i) FBSD-STD
  	}
  	# Put all the nodes in a lan
  	set big-lan [$ns make-lan "$lanstr" 100Mb 0ms]
  	# Go!
  	$ns run
Beginning the Experiment
After logging on to the Emulab Web Interface, choose the “Begin Experiment” option from the menu. First select which project you want the experiment to be configured in. Most people will be a member of just one project, and will not have a choice. If you are a member of multiple projects, be sure to select the correct project from the menu. Next fill in the Name’ and Description’ fields. The Name should be a single word (no spaces) identifier, while the Description is a multi word description of your experiment. In the “Your NS file” field, place the local path of an NS file which you have created to describe your network topology. This file will be uploaded through your browser when you choose “Submit.” After submission, Emulab will begin processing your request. This will likely take several minutes, depending on how large your topology is, and what other features (such as delay nodes and bandwidth limits) you are using. Assuming all goes well, you will receive an email message indicating success or failure, and if successful, a listing of the nodes and IP address that were allocated to your experiment. For the NS file described above, you would receive a listing that looks similar to this:
  	Virtual Node Info:
  	ID              Type         OS              Qualified Name
  	--------------- ------------ --------------- --------------------
  	nodeA           pc			     nodeA.myexp.myproj.emulab.net
  	nodeB           pc                           nodeB.myexp.myproj.emulab.net
  	nodeC           pc                           nodeC.myexp.myproj.emulab.net
  	nodeD           pc                           nodeD.myexp.myproj.emulab.net
  	Physical Node Mapping:
  	ID              Type         OS              Physical
  	--------------- ------------ --------------- ------------
  	tbsdelay0       pc850        FBSD47-STD      pc61
  	nodeB           pc850        RHL73-STD       pc63
  	nodeC           pc600        RHL73-STD       pc31
  	nodeD           pc600        RHL73-STD       pc34
  	nodeA           pc600        RHL73-STD       pc13
  	Virtual Lan/Link Info:
  	ID              Member          IP/Mask         Delay     BW (Kbs)  Loss Rate
  	--------------- --------------- --------------- --------- --------- ---------
  	lan0            nodeC:0         10.1.2.3        0.00      100000    0.000
  	                                255.255.255.0   0.00      100000    0.000
  	lan0            nodeB:1         10.1.2.4        0.00      100000    0.000
  	                                255.255.255.0   0.00      100000    0.000
  	lan0            nodeD:0         10.1.2.2        0.00      100000    0.000
  	                                255.255.255.0   0.00      100000    0.000
  	link0           nodeB:0         10.1.1.2        25.00     30000     0.005
  	                                255.255.255.0   25.00     30000     0.005
  	link0           nodeA:0         10.1.1.3        25.00     30000     0.005
  	                                255.255.255.0   25.00     30000     0.005
  	Physical Lan/Link Info:
  	ID              Member          Delay Node   Delay    BW (Kbs) PLR    Pipe
  	--------------- --------------- ------------ -------- -------- ------ ---------
  	link0           nodeA           tbsdelay0    50.00    30000    0.010  100
  	link0           nodeB           tbsdelay0    50.00    30000    0.010  110
  	Route List:
  	Node            Interface       Dest            Nexthop         Type  Cost
  	--------------- --------------- --------------- --------------- ----- ----
  	nodeA           10.1.1.3     10.1.2.4     10.1.1.2     host  0
  	nodeA           10.1.1.3     10.1.2.0     10.1.1.2     net   0
  	nodeC           10.1.2.3     10.1.1.0     10.1.2.4     net   0
  	nodeD           10.1.2.2     10.1.1.0     10.1.2.4     net   0
A few points should be noted:
-
A single delay node was allocated and inserted into the link between nodeA and nodeB. This link is invisible from your perspective, except for the fact that it adds latency, error, or reduced bandwidth. However, the information for the delay links are included so that you can modify the delay parameters after the experiment has been created.
-
Delays of less than 2ms (per trip) are too small to be accurately modeled at this time, and will be silently ignored. A delay of 0ms can be used to indicate that you do not want added delay; the two interfaces will be “directly” connected to each other.
-
Each link in the “Virtual Lan/Link” section has its delay, etc., split between two entries. One is for traffic coming into the link from the node, and the other is for traffic leaving the link to the node. In the case of links, the four entries often get optimized to two entries in the “Physical Lan/Link” section.
-
The names in the “Qualified Name” column refer to the control network interfaces for each of your allocated nodes. These names are added to the Emulab nameserver map on the fly, and are immediately available for you to use so that you do not have to worry about the actual physical node names that were chosen. In the names listed above, myproj’ is the name of the project that you chose to work in, and myexp’ is the name of the experiment that you provided in the “Begin an Experiment” page.
-
Please don’t use the “Qualified Name” from within nodes in your experiment, since it will contact them over the control network, bypassing the link shaping we configured. (See also these two FAQ entries: here and here.)
Using your Nodes
By the time you receive the email message listing your nodes, the Emulab configuration system will have ensured that your nodes are fully configured and ready to use. If you have selected one of the Emulab-supported operating system images (FreeBSD, Linux, or [Windows XP](https://wiki.emulab.net/wiki/Emulab/wiki/Windows)), this configuration process includes:
-
loading fresh disk images so that each node is in a known clean state;
-
rebooting each node so that it is running the OS specified in the NS script;
-
configuring each of the network interfaces so that each one is “up” and talking to its virtual LAN (VLAN);
-
creating user accounts for each of the project members;
-
mounting the projects NFS directory in /proj so that project files are easily shared amongst all the nodes in the experiment;
-
creating a /etc/hosts file on each node so that you may refer to the experimental interfaces of other nodes by name instead of IP number;
-
configuring all of the delay parameters;
-
configuring the serial console lines so that project members may access the console ports from users.emulab.net or directly from their desktop.
As this point you may log into any of the nodes in your experiment. You will need to use Secure Shell (ssh), and you should use the `qualified name’ from the nodes mapping table so that you do not form dependencies on any particular physical node. Your login name and password will be the same as your Web Interface login and password. The /etc/hosts file on each node will provide a local name mapping for the other nodes in your experiments. You should take care to use these names (or IP numbers) and not the .emulab.net names listed in the node mapping, since the Emulab names refer to the control network LAN that is shared amongst all nodes in all experiments. It is only the experimental interfaces that are entirely private to your experiment. (See also these two FAQ entries: here and here.) NOTE: The configuration process just described occurs only on Emulab constructed operating system images. If you are using an OSKit kernel, or your own disk image with your own operating system, you will be responsible for all of the configuration. At some point we hope to provide tools to assist in the configuration, but for now you are on your own. Ask Testbed Ops for help or more information.
I need root access!
If you need to customize the configuration, or perhaps reboot nodes, you can use the “sudo” command, located in /usr/local/bin on FreeBSD and Linux, and /usr/pkg/bin on NetBSD. All users are added to the Administrators group on Windows XP nodes. Our policy is very liberal; you can customize the configuration in any way you like, provided it does not violate Emulab’s administrative policies. As as example, to reboot a node that is running FreeBSD:
/usr/local/bin/sudo reboot
My node is wedged!
This is bound to happen when running experimental software and/or experimental operating systems. Fortunately we have an easy way for you to power cycle nodes without requiring Tested Operations to get involved. If you must power cycle a node, log on to users.emulab.net and use the “node_reboot” command:
node_reboot [node ... ]
where node is the physical name, as listed in the node mapping table. You may provide more than one node on the command line. Be aware that you may power cycle only nodes in projects that you are member of. Also, node_reboot does its very best to perform a clean reboot before resorting to cycling the power to the node. This is to prevent the damage that can occur from constant power cycling over a long period of time. For this reason, node_reboot may delay a minute or two if it detects that the machine is still responsive to network transmission. In any event, please try to reboot your nodes first (see above). You may also reboot all the nodes in an experiment by using the -e option to specify the project and experiment names. For example:
node_reboot -e testbed,multicast
will reboot all of the nodes reserved in the “multicast” experiment in the “testbed” project. This option is provided as a shorthand method for rebooting large groups of nodes.
I’ve scrogged my disk!
Scrogging your disk is certainly not as common, but it does happen. You can either terminate your experiment, and recreate it (which will allocate another group of nodes), or if you prefer you can reload the disk image yourself. You will of course lose anything you have stored on that disk; it is a good idea to store only data that can be easily recreated, or else store it in your project directory in /proj. Reloading your disk with a fresh copy of the default image is easy, and requires no intervention by Emulab staff:
os_load [node ... ]
os_load will wait (not exit) until the nodes have been reloaded, so that you do not need to check the console lines of each node to determine when the load is done.
I’ve finished my experiment
When your experiment is completed, and you no longer need the resources that have been allocated to it, you will need to terminate the experiment via the Emulab Web Interface. Click on the “End An Experiment” link. You will be presented with a list of all of the experiments in all of the projects for which you have the authorization to terminate experiments. Select the experiment you want to terminate by clicking on the button in the “Terminate” column on the right hand side. You will be asked to confirm your choice. The Emulab configuration system will then tear down your experiment, and send you an email message when the process is complete. At this point you are allowed to reuse the experiment name (say, if you wanted to create a similar experiment with different parameters).
Scheduling experiment swapout/termination
If you expect that your experiment should run for a set period of time, but you will not be around to terminate or swap the experiment out, then you should use the scheduled swapout/termination feature. This allows you to specify a maximum running time in your NS file so that you will not hold scarce resources when you are offline. This can also be used in conjunction with ‘batch mode’experiments to ensure that they do not run longer than is reasonably expected. To schedule a swapout or termination in your NS file:
     $ns at 2000.0 "$ns terminate"
   or
     $ns at 2000.0 "$ns swapout"
This will cause your experiment to either be terminated or swapped out after 2000 seconds of wallclock time.
Getting Help!
If you have any questions or problems, or just want to comment on Emulab’s operation (maybe you want to suggest an improvement to one of the Web pages), feel free to contact us by sending email to Testbed Operations. Please send all correspondence to this address, not to individual members of our team. Messages that aren’t on this list may not get responses. Also note that much of the software is in development, and occasionally things might break or not work as you expect. Again, please feel free to contact us.